September 30, 2010

Glow-in-the-Dark BOO

I must admit that I was skeptical about Martha Stewart's glow-in-the-dark glitter at first.  After using it, though, I am a proud supporter!  The bottle was so easy to use, with the easy-pour lid, and the glitter was just right for the coverage I needed.  I painted BOO onto a plastic pumpkin with Mod Podge, then poured the glitter on top.  
VOILA!

Articles of Faith Book

A while ago, I came across a huge poster with the 13 Articles of Faith (from the LDS Church) in a closet.  I didn't really have anywhere to hang it, but decided that it would make a fantastic book.  My five year old daughter has already memorized the first three Articles, but would really like to know the rest.  The only problem is that she can't read fluently yet, and thus needs photos to help.  I had a book from Bare Books in my supplies that was perfect for the project.  The book was so easy to make!  I simply cut up the poster, put an Article of Faith on the left page, and cut up pictures to match each Article for the right page.  My daughter is ecstatic about the book.  I'm excited to have a wonderful addition to our Sacrament Meeting bag for Sundays!

FRONT COVER
 INSIDE FRONT COVER
 PAGE EXAMPLES


 INSIDE BACK COVER
 BACK COVER

***Don't forget to enter the wingflash designs giveaway by Sunday!***

September 26, 2010

wingflash designs GIVEAWAY

I am so excited to be hosting this giveaway!  Today's giveaway comes from wingflash designs, a jewelry store owned by my high school friend, Laura, who is unbelievable talented.


wingflash designs is a tiny, one-woman-run jewelry business in Tucson, AZ.  Owner/Designer/Jeweler Laura Kepner-Adney has been making jewelry since she was five, but only started marketing her work in the past three years, after apprenticing for a jeweler in New Zealand.  Her goal is to make pieces that are practical enough for everyday wear, but classy enough for a night out; she says, "I design jewelry that looks equally sexy with a shovel and a cocktail dress."  

Laura has generously agreed to giveaway this stunning necklace:
It is a shark tooth electroformed with 24k gold, and a ruby, hanging on a gold-plated sterling silver chain.  The necklace retails for $120.  
What I love about Laura's jewlery is that, not only is it absolutely beautiful, it is completely unique.  I'm quite jealous of all of you who are eligible to win--I wish that I could enter!

How to Enter:
1. Visit wingflash designs and let me know which piece is your favorite.
2. Like wingflash designs on Facebook.
3. Become a follower of Martha Shmartha.
4. Like Martha Shmartha on Facebook.
5. Link up to this giveaway on Facebook, Twitter or post it on your blog.

Please leave me a SEPARATE COMMENT for each way that you enter.  (i.e. Comment 1: I follow your blog.  Comment 2: I blogged about the giveaway, etc.)
This giveaway is open until 11:59PM on Sunday October 3rd.  I will chose a winner randomly on October 4th.

GOOD LUCK!

September 22, 2010

Fall Blessings Barn Star

I've been eyeing barn stars for months now, but haven't wanted to spend the money to buy one.  Yesterday, though, while walking through Michaels, I found a paper mache barn star that was much cheaper than the plastic/metal ones I've seen previously.  I simply mod podged each star face with a different paper representing many of my favorite things about fall.  My 5 year old summed it up perfectly when she said, "I love it, Mommy.  I could just stare at it for hours."


I'm linking up to:
Join  us Saturdays at tatertotsandjello.com for the weekend wrap up          party!

September 5, 2010

Princess Tea Party

My daughter turned five years old yesterday, so we celebrated with a Princess Tea Party!  Because she's still so young, we only wanted to do something small.  We had six girls, for just an hour and fifteen minutes.  It was perfect... Any longer and I think it might have lost its magic.  Let me show you what we did!

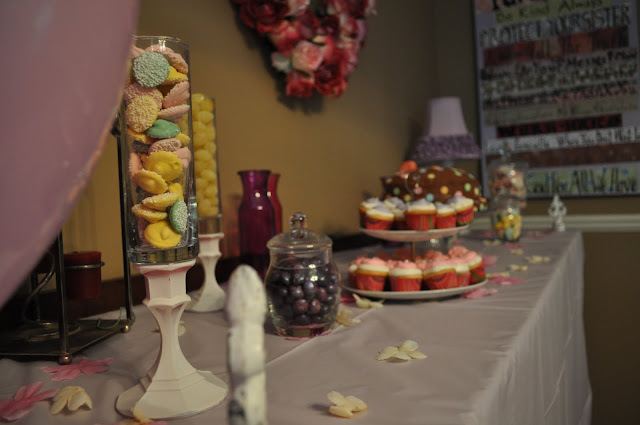
Decorating was the main event.  Luckily, we were able to dig around our house and find just about everything that we needed.  I had purchased the giant rose wreath months ago at Goodwill--I was going  to pull the roses off and use the frame, but it was perfect for our tea party.  The lamp is from my kids' bedroom.  Then we just filled every glass jar we could find with pretty candies.  I picked up the china cupcake stand for a couple of bucks at Goodwill, as well.  We really only bought candy and balloons!
The cupcakes were a cinch to decorate.  I whipped up a batch of buttercream frosting, dropped a dollop of white onto each mini-cupcake, refrigerated them until set, then dropped another dollop of either pink or purple on top.  I topped them with a tiny pearl candy.
The cake is a two layer chocolate cake with chocolate buttercream frosting between the layers and on the outside.  I then used giant confetti sprinkles to polka-dot the whole thing.  I used the mini candy pearls (like on the cupcakes) to make a "5," and to outline the rose.  I created the rose from marzipan, then used edible pearl dust to color it pink.
To begin our tea party, we rang this beautiful bell.  It was my grandma's.
My daughter found this fancy hat candle holder at Goodwill, too, for only $2.  I always think of big hats when I think of tea parties, don't you?
To set the table, I purchased a cup and saucer for each girl, from Goodwill.  Each cup and saucer only cost about $.30, so to say that it was cost effective is an understatement!  We sent them each home with their own teacup and saucer, in lieu of goodie bags.

We began the party by decorating the crowns you see at each place setting (12 for $2.50 at JoAnn's).  The girls could color their crowns or glue tiny jewels onto the front.  (We already had the jewels, as they were actually the dragon scales that we used in the wand cores for my son's Harry Potter birthday party in April.)  This was a good opening activity, as it gave the kids something to do when they arrived, and while they waited for the actual tea party to begin.
After crown decorating, we painted their fingernails.  I just grabbed a few dollar varieties, plus some cheap decals that we put on once their nails were dry.  This was a big hit; all the girls talked about how excited their moms would be to see their pretty nails.
While the girls had their nails painted and waited to dry, my husband did face-painting.  We didn't do anything crazy, just whatever little thing the girls wanted.  It was mostly balloons, butterflies, hearts, etc.  I do think he did a castle with a moon in the middle and a red Christmas tree, though...
After the nails were dry and faces were painted, we served pink hot chocolate.  We don't drink real tea, plus I figured the girls would prefer hot chocolate to tea any day.  I simply heated eight cups of milk on the stove, poured in a bag of white chocolate chips (once the milk was steaming), added a touch of vanilla, then some pink food coloring.  Voila!
We also served the cupcakes, candy, cookies, etc. that were being used as decorations during this time.  This was the actual tea party!
Once the hot chocolate was poured, we sang Happy Birthday and ate cake.  Did I serve way too much sugar?  Yes.  Was it worth it, though?  Definitely!
Then we opened presents and time was up!  Short and sweet describes our Princess Tea Party perfectly.  My daughter loved it, the other girls had fun, and it was so very simple to do.  What more can you ask for?

I'm linking up to:

September 3, 2010

Easiest Fall Monogram Wreath Tutorial

Fall is absolutely, without a doubt, my favorite season.  On September 1st, I pulled out all of my fall decorations and spent the morning transforming my home.  (That was also the day my son started school, and I had to keep busy to keep from crying the entire day!)  Today the weather has cooled enough to make it feel like fall--What perfect timing, as I made a new fall wreath for our front door last night!  

SUPPLIES
Styrofoam wreath form (mine was 10")
Fall Ribbon--Enough to wrap the entire wreath and cover the door hanger
1 Strand/Garland of fall leaves (On sale now at JoAnn's!)
Floral Pins (Sewing pins would work fine, too.)
Door/Wreath Hanger

Wrap the fall-themed ribbon around the entire wreath, covering it completely.  I used floral pins to secure the ribbon, as I like to be able to change my wreaths around, but you could use a glue gun, instead.
Create a loop at the top of your wreath with one end of your leaf garland.  Secure it with a pin.
Continuing from where you started the garland with the loop, wrap the garland in and out of the wreath, until you've used the entire length.  (Sorry if this isn't too clear; just wrap it around, the same way you did the ribbon.)  Secure the end with another pin.  
You can see the pin that I used to secure the end of the ribbon in the first step.  Don't worry about those pins because you can arrange the leaves to cover anything that shows.
Wrap your door hanger in ribbon, too, if you like.  I used double sided tape to secure the ribbon.
This is what I first hung on my door.  I really liked it, but felt like it needed something else.  So I scrounged around my craft room and found a letter "D" that I had mod podged a few months ago, but never did anything with.  Luckily it fit perfectly inside my wreath, and matched!
Here's the final product!  I love the monogram in the middle; I feel like it really makes the wreath.  How easy was that?!

HAPPY FALL!

I'm linking up to:


Related Posts with Thumbnails